
The tank is a 50 gallon plexiglass tank bought at a local store. The stand, sump, skimmer, and miscellaneous plumbing are home-made. I'm not going to go into a lot of detail on them yet... Once I get a skimmer design that I'm satisfied with, I may put up the design for it.
Here's a nice picture of the tank on the stand outside, getting tested for leaks (and making sure the stand is stable under the weight). The stand is made from pine (1" laminated, for the sides and top), oak (doors and trim), and random plywood (back and bottom), fit with rabbet joints. It's sturdy as all heck (which was the goal). As my first "real" wood project, there's room for improvement. On the whole I'm happy with it.
Of course I didn't use this water. Roughly 55 gallons of reverse-osmosis water (purchased from a place close by) was used, with approximately 16 pounds of Instant Ocean salt.
I made up a diagram of the plumbing.
Here's a closeup of the overflow. It was simply fabricated from PVC pipe and a replacement pump screen, which was cemented to the PVC with silcone aquarium sealant. It works well at my current flow rate, which is only about 150 gallons per hour. If I want a higher flow rate, I may have to switch to a different overflow design. That shouldn't be a big deal.

The inlet is simply a PVC elbow, turned slightly toward the overflow to enhance surface skimming. (Since a lot of organics and other junk will accumulate on the surface of the water, it's best if the water is drawn into the filtration system from the surface.)

I've put together a new protein skimmer. The skimmer lives in the sump, where I also house the heater and other water-processing gadgets. Here you can see the powerhead and its native venturi pumping air and water into the skimmer in the front. The pump returning water to the tank is in the back left, inside the bottom part of a milk container (to minimize the mess if the overflow gets clogged, and to turn the sump into a sort of settling filter). You can also see the container which the skimmate (condensed foam) drains into in the upper middle of the picture. Also, I have a perforated nylon bag with activated carbon in the front left, to take the yellow tint out of the water. (You can't see all of this in the picture... I'll get a picture of the whole sump when I have time...)
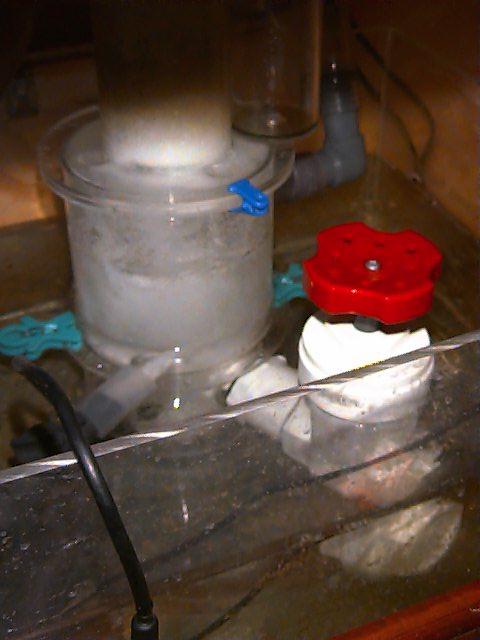
The thing with the red knob, in the front on the right, is a gate valve which can be used to control the height of water inside the skimmer. I've adjusted it so that the water is just up to the bottom of the foam riser (the smaller diameter tube).
The basic function of the skimmer is to mix air and water together and collect the foam that results. Many organic compounds are attracted to the surface of bubbles in the water and will (in sufficient amounts) stabilize the bubble, thus forming foam. (This is the same process that forms foam in surf on the beach.)
The challenges come into the mixing and the foam collection. Ideally, small bubbles will be produced in the water and in high concentration, thereby maximizing the total bubble surface area and water-to-air contact and minimizing the amount of surfactants needed to stabilize an individual bubble. However, small bubbles are difficult to collect, since they are carried more easily by currents, and if they are too small they will just dissolve. Also, the foam should be collected "dry" (with low water content), which means the skimmer should be designed so that the water will settle out of the foam before it is collected.
Chris Paris has a lot to say about skimmer design. Personally, I just guess.
Things to do... Well, I wanted to make sure my new skimmer worked out first. Now I'm ready to start working on a automatic top-off system (to make up for evaporation), and a better water circulation system. Also, I want to put in some float switches to shut off the pumps if the water level gets too high, and I'm working on a couple of ideas for a surge device.